















 深耕数码、AI兴趣领域





3
3
零基础也能会!Docker一键部署MyDrive,打造个人专属云盘
2026-04-08 00:52:59
1点赞
9收藏
0评论
零基础也能会!Docker一键部署MyDrive,打造个人专属云盘
1.1 MyDrive项目简介
1.2 MyDrive主要特点
2.1 本地环境规划
2.2 本次实践介绍
3.1 检查Docker服务状态
3.2 检查Docker版本
3.3 检查docker compose 版本
5.1 创建挂载目录
5.2 编辑环境变量文件
5.3 编辑部署文件
5.4 创建MyDrive容器
5.5 查看MyDrive容器状态
5.6 检查MyDrive容器日志
6.1 访问初始页
6.2 注册账号
6.3 上传文件
6.4 在线预览视频
一、MyDrive介绍
1.1 MyDrive项目简介
myDrive是一个开源的云文件存储服务器,功能类似于 Google Drive。您可以在自己的服务器或可信平台上部署 myDrive,然后通过任何现代网页浏览器随时随地安全地访问您的文件。它采用 MongoDB 存储文件和文件夹的元数据,并支持多种后端(如 Amazon S3 或本地文件系统)来存储文件的实际数据块,具备高度的灵活性和可扩展性。结合现代 Web 技术,myDrive 提供了流畅的用户体验和强大的安全特性。
1.2 MyDrive主要特点
上传文件:支持快速、稳定地上传单个或多个文件到云端。
下载文件:可随时从服务器下载所需文件,操作简单便捷。
上传文件夹:支持整文件夹上传,保留目录结构,提升管理效率。
下载文件夹:下载整个文件夹时会自动打包为 ZIP 文件,方便传输。
多存储后端支持:灵活支持 Amazon S3、本地文件系统等多种存储方式,便于按需部署。
照片与视频查看器:内置媒体播放器,可在浏览器中直接预览图片和视频。
媒体画廊:自动组织图片和视频为可视化画廊,提升浏览体验。
生成缩略图:自动为图片和视频生成缩略图,加快页面加载速度。
文件分享:支持生成分享链接,轻松与他人共享文件或文件夹。
PWA 支持:支持渐进式 Web 应用(PWA),可安装到桌面或手机,离线可用。
AES-256 加密:对敏感数据进行 AES-256 位加密,保障文件传输与存储安全。
Service Worker:利用 Service Worker 实现缓存和离线访问能力,提升性能。
移动端支持:响应式设计,完美适配手机和平板等移动设备。
Docker 部署:提供 Docker 支持,一键部署,环境隔离,运维更轻松。
邮箱验证:注册时需邮箱验证,增强账户安全性和用户真实性。
JWT 认证机制:采用 JWT(含访问与刷新令牌)实现安全的用户身份认证与会话管理。
二、本次实践规划
2.1 本地环境规划
本次实践为个人测试环境,操作系统版本为 Ubuntu 24.04.2 LTS。

2.2 本次实践介绍
1.本次实践部署环境为个人测试环境,生产环境请谨慎;
2.在Docker环境下部署MyDrive云盘服务。
三、本地环境检查
3.1 检查Docker服务状态
检查Docker服务是否正常运行,确保Docker正常运行。
root@jeven:~# systemctl status docker
● docker.service - Docker Application Container Engine
     Loaded: loaded (/usr/lib/systemd/system/docker.service; enabled; preset: enabled)
     Active: active (running) since Sat 2025-10-04 13:29:05 UTC; 2 days ago
TriggeredBy: ● docker.socket
   Main PID: 888 (dockerd)
      Tasks: 65
     Memory: 1.2G (peak: 1.4G)
        CPU: 3min 23.296s
     CGroup: /system.slice/docker.service
3.2 检查Docker版本
检查Docker版本
root@jeven:~# docker -v
Docker version 28.5.0, build 887030f
3.3 检查docker compose 版本
检查Docker compose版本,确保2.0以上版本。
root@jeven:~# docker compose version
Docker Compose version v2.39.4
四、拉取MyDrive镜像
下载MyDrive相关镜像,如下所示:
docker pull kylehoell/mydrive:latest
docker pull mongo:8
五、部署MyDrive服务
5.1 创建挂载目录
创建以下目录
mkdir -p /data/mydrive/{data,db,temp} && cd /data/mydrive
宿主机
/data/mydrive/data: 用于存放 myDrive 上传的文件宿主机
/data/mydrive/temp: 用于存放临时文件,例如生成视频缩略图时宿主机
/data/mydrive/db: 用于存放 MongoDB 数据库文件
5.2 编辑环境变量文件
在/data/mydrive部署目录下,新建及编辑环境变量文件:
vim .env
# If you are using Docker, set DOCKER=true
DOCKER=true

# MongoDB URL: Connection string for your MongoDB database
# Note: if using the compose file provided, the connection string should be as follows:
MONGODB_URL=mongodb://username:password@mongo:27017/mydrive?authSource=admin

# Database Type: Choose between "fs" and "s3", this specifies where the files will be stored.
# fs = Filesystem
# s3 = Amazon S3
DB_TYPE=fs

# If using fs,
# File Storage Directory: The directory where the files will be stored. Must be exact path.
# PATH MUST END IN A SLASH
# Example: /home/kyle/mydrive/ (must end in a slash)
FS_DIRECTORY=/data/

# If using s3,
# S3 Data: The S3 bucket and key where the files will be stored.
S3_ID=
S3_KEY=
S3_BUCKET=

# Encryiption Key (optional): The encryption key used to encrypt the files.
# DO NOT LOSE OR FORGET THIS KEY AS ALL DATA WILL BE LOST IF YOU LOSE IT.
# If you do not supply a key, the app will instead prompt you to type one into the terminal when you start the server.
KEY=9f3c8a1d4e7b2c5f6a0e8d4c3b2a1f9e8d7c6b5a4f3e2d1c0b9a8f7e6d5c4b3a


# Access tokens, refresh, and cookie
# These should be randomly generated in a secure manner.
# If you lose these tokens, all users will be logged out.
# You can also change these if you want to force all users to be logged out.
# Each token should be a different string.
# Example: sa4hQqJwGFLC1LJk59
PASSWORD_ACCESS=2e1f0d9c8b7a6f5e4d3c2b1a0f9e8d7c6b5a4f3e2d1c0b9a8f7e6d5c4b3a2f1e
PASSWORD_REFRESH=5a4b3c2d1e0f9a8b7c6d5e4f3a2b1c0d9e8f7a6b5c4d3e2f1a0b9c8d7e6f5a4b
PASSWORD_COOKIE=7c6d5e4f3a2b1c0d9e8f7a6b5c4d3e2f1a0b9c8d7e6f5a4b3c2d1e0f9a8b7c6d

# Video thumbnails (optional): If you want to enable video thumbnails, configure as so.
# Video thumbnail generation relies on ffmpeg, please ensure you have it installed.
# VIDEO_THUMBNAILS_ENABLED=true
VIDEO_THUMBNAILS_ENABLED=true

# Video thumbnails continued (optional):
# Sometimes generating a video thumbnail will fail with the default method.
# If so you can choose to instead temporarily store the video in a directory, and generate a thumbnail from that.
# WARNING: The file will be temporarily stored in this directory UNENCRYPTED.
# Temp directory example: /Users/kyle/mydrive/temp/ (must end in a slash)
# Temp video thumbnail limit: The maximum size of a video thumbnail in bytes.
# Example: 5000000000
TEMP_DIRECTORY=/temp/
TEMP_VIDEO_THUMBNAIL_LIMIT=5000000000

# Block account creation (optional): If you want to block account creation, configure as so, but after you create an account.
# BLOCK_CREATE_ACCOUNT=true

# Ports (optional): The ports to run the server on.
# HTTP_PORT: Default port is 3000
# HTTPS_PORT: Default port is 8080
HTTP_PORT=
HTTPS_PORT=

# URL (optional): The URL to run the server on.
# Most likely not needed, this changes the ip address/url express listens on.
URL=

# Email verifcation (optional): If you want to enable email verification configure as so.
# EMAIL_VERIFICATION=true
# Remote URL: This refers to the URL sent in the verification email: Example https://mydrive-storage.com
# Please navigate to the following link to verify your email address: {REMOTE_URL}/verify
# Should NOT end with a slash
EMAIL_VERIFICATION=
EMAIL_DOMAIN=
EMAIL_ADDRESS=
EMAIL_API_KEY=
EMAIL_HOST=
REMOTE_URL=

# Marks cookie generation as secure (Optional)
# This is recommended and should be enabled if you are running the app on HTTPS.
# SECURE_COOKIES=true
SECURE_COOKIES=


# SSL (Optional): If you want to enable SSL, configure as so.
# SSL=true
# Place your SSL certificate files in the root directory of the project
# With the names: certificate.crt, certificate.key, and certificate.ca-bundle;
SSL=

# HTTPS cert paths (optional): If you need to change the paths of the https certs
# You can do so with these env variables.
# By default myDrive looks for certificate.crt, certificate.ca-bundle and certificate.key on the root of the project
HTTPS_KEY_PATH=
HTTPS_CA_PATH=
HTTPS_CRT_PATH=
注意事项:
在配置环境变量文件时,请特别注意以下几点,以确保系统的安全性和数据的完整性:
MONGODB_URL 用户名和密码的一致性:
确保
.env文件中的MONGODB_URL所含的用户名和密码与docker-compose.yml文件中设置的数据库用户和密码完全一致。这一步骤对于保证数据库连接的正确性至关重要。
加密密钥(KEY)的重要性:
KEY是用于加密所有上传文件的密钥。一旦设置完成,在整个应用生命周期内必须保持不变。丢失或更改此密钥将导致所有已上传的文件无法解密,从而造成数据不可恢复的损失。因此,强烈建议您妥善保存该密钥,并确保其安全性。
账户安全相关密钥的必要更新:
PASSWORD_ACCESS,PASSWORD_REFRESH, 和PASSWORD_COOKIE这三个值是保障账户安全的关键所在。它们应当被修改为复杂且独特的字符串,以增强系统的安全性。每个值都应独一无二,避免使用默认值或简单易猜的组合。这些密钥的安全性直接影响到用户认证和会话管理的安全等级。
请遵循上述指导原则进行配置,以维护系统运行的安全性和稳定性。在处理密钥和敏感信息时务必小心谨慎,并采取适当措施保护这些信息不被未授权访问。
环境变量解释:


5.3 编辑部署文件
新建及编辑docker-compose.yaml文件,宿主机映射端口可自行设置,注意防止端口冲突。
vim docker-compose.yaml
services:
    app:
        image: kylehoell/mydrive:latest
        container_name: mydrive-app
        volumes:
            # Use the following volumes section if you want to use bind mounts:
            # - /path/to/data:/data/
            # - /path/to/temp:/temp/

            # Use the following volumes section if you want to use named volumes:
            - ./data:/data/
            - ./temp:/temp/
        ports:
            - "7600:3000"
            # Optional: Uncomment the following line if you want to use HTTPS
            #- "${HTTPS_PORT:-8080}:8080"

        # Use expose: if using a reverse proxy
        # expose:
        #     - 3000
        #     - 8080
        env_file:
            - .env # Copy .env.example to .env and fill in the values

    mongo:
        image: mongo:8
        container_name: mydrive-mongo
        restart: always
        environment:
            MONGO_INITDB_ROOT_USERNAME: username
            MONGO_INITDB_ROOT_PASSWORD: password
        # expose:
        #     - 27017
        volumes:
            - ./db:/data/db
        healthcheck:
            test: ["CMD", "mongosh", "--eval", "db.adminCommand('ping')"]
            timeout: 10s
            interval: 10s
            retries: 10
            start_period: 10s
5.4 创建MyDrive容器
执行以下命令,创建MyDrive容器。
docker compose up -d
5.5 查看MyDrive容器状态
检查MyDrive容器运行状态,确保MyDrive容器正常启动。
root@jeven:/data/mydrive# docker compose ps
NAME            IMAGE                      COMMAND                  SERVICE   CREATED              STATUS                        PORTS
mydrive-app     kylehoell/mydrive:latest   "docker-entrypoint.s…"   app       About a minute ago   Up About a minute             8080/tcp, 0.0.0.0:7600->3000/tcp, [::]:7600->3000/tcp
mydrive-mongo   mongo:8                    "docker-entrypoint.s…"   mongo     About a minute ago   Up About a minute (healthy)   27017/tcp
5.6 检查MyDrive容器日志
检查容器运行日志,确保MyDrive服务正常运行。
docker compose logs app
六、访问MyDrive服务
6.1 访问初始页
浏览器地址:
http://<个人的服务器IP>:7600,访问MyDrive初始页。如果无法访问,请确保宿主机的防火墙已关闭或已放行相关端口,对于云服务器还需配置相应的安全组规则。

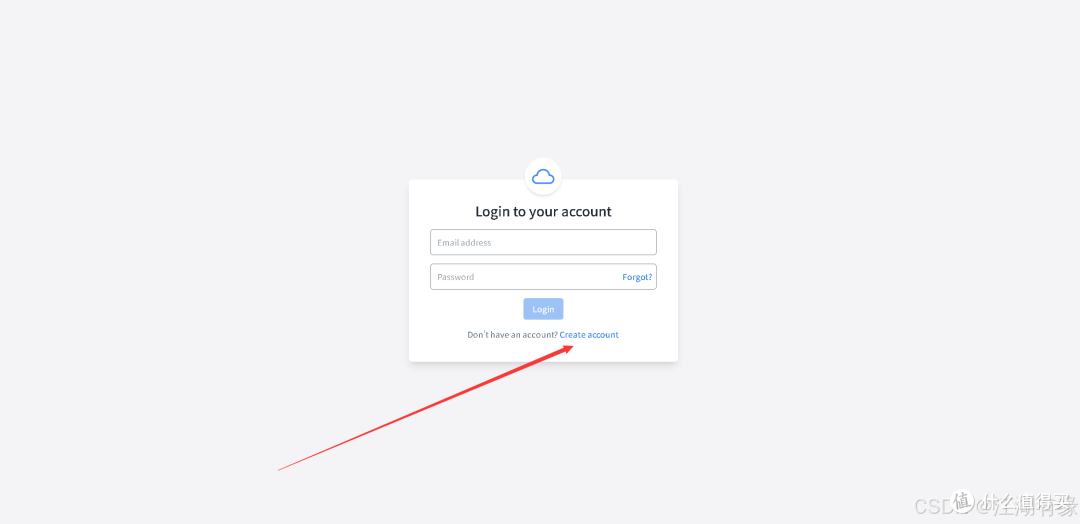
6.2 注册账号
在MyDrive注册页,填写账号信息,注册即可。


6.3 上传文件
点击“ADD NEW”选项,上传本地文件到MyDrive云盘。

双击上传的文件,可进行下载操作。

分享文件:对上传的文件名鼠标右键——[share],可设置公开分享链接。

6.4 在线预览视频
上传的视频文件,可双击在线预览播放。

七、总结
本次Docker部署MyDrive云盘服务的实践顺利完成,整个过程流程清晰、操作简便。通过Docker容器化技术,我们快速搭建了一个功能完整、安全可靠的私有云存储环境。MyDrive丰富的特性如文件加密、在线预览和移动端支持,展现了其作为开源网盘的强大实用性。此次实践为构建个人或团队的私有云存储解决方案提供了高效可行的参考路径。
作者声明本文无利益相关,欢迎值友理性交流,和谐讨论~