




 深耕美食、数码、居家兴趣领域







3
4
AI助力,快速学习墨水屏开发
2025-03-24 10:51:56
17点赞
21收藏
22评论
以前读书的时候挺排斥编程这门课程,但是工作之后发觉如果做IT领域的工作,不触碰代码是不可能的;好在目前随着AI的快速发展,程序员的工作内容不少都可以替代了,利用AI平台学习编程开发成了一条捷径。
这次我突发奇想,想自制一个家用的天气预报站,作为摆件放置在书桌上,既好玩又实用。
之前玩树莓派的时候还有不少闲置传感器,比如可以检测室内温度、湿度、大气压的BME280也可以连接上去,同时显示家中的温度情况。
这种天气预报站其实并不需要持续刷屏显示,所以选择墨水屏就非常合适,省电节能。
主要配件都购自淘宝:
这家买的墨水屏和驱动板。
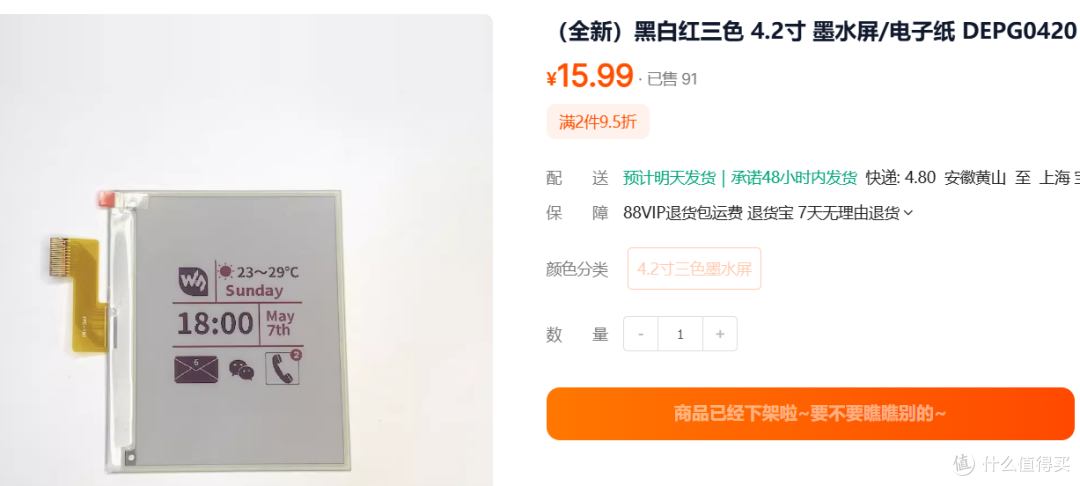
价格还挺便宜的,十几块钱的全新三色墨水屏,还提供视频教程和代码。
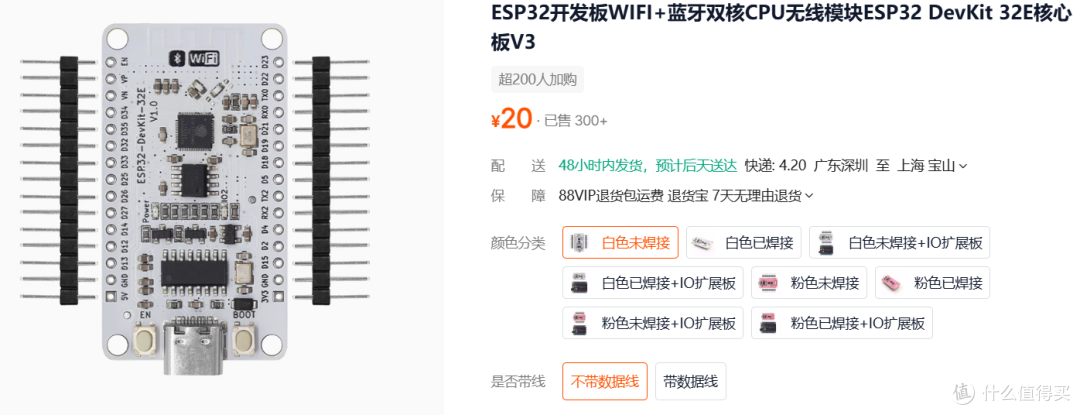
ESP32开发板,淘宝很容易买到,十几块到二十几块都有。
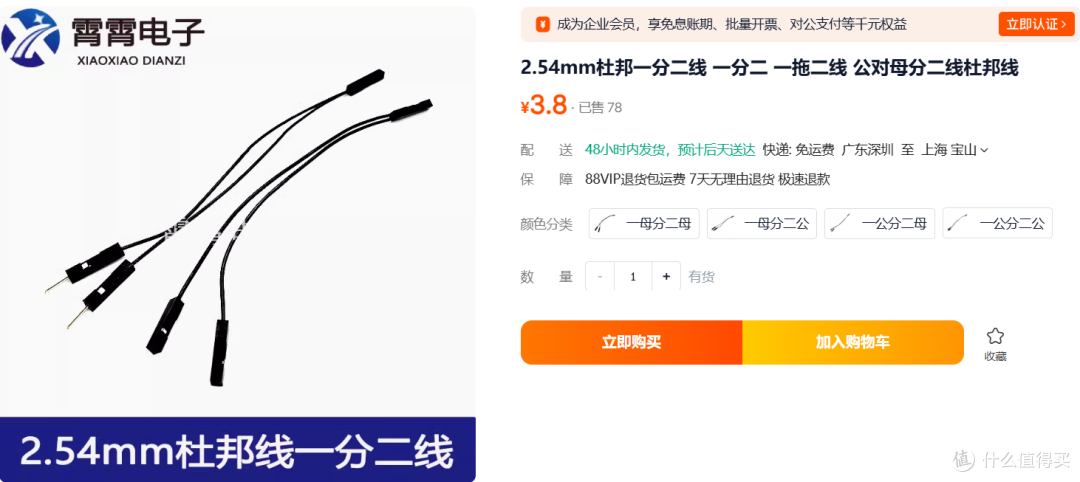
杜邦线家里有闲置的,这次额外买了根,用于将开发板3V的引脚一分二。
配件准备好,下面就是安装开发工具。
这里使用Arduino IDE,这一软件在Windows和Mac平台都可以下载。下载地址
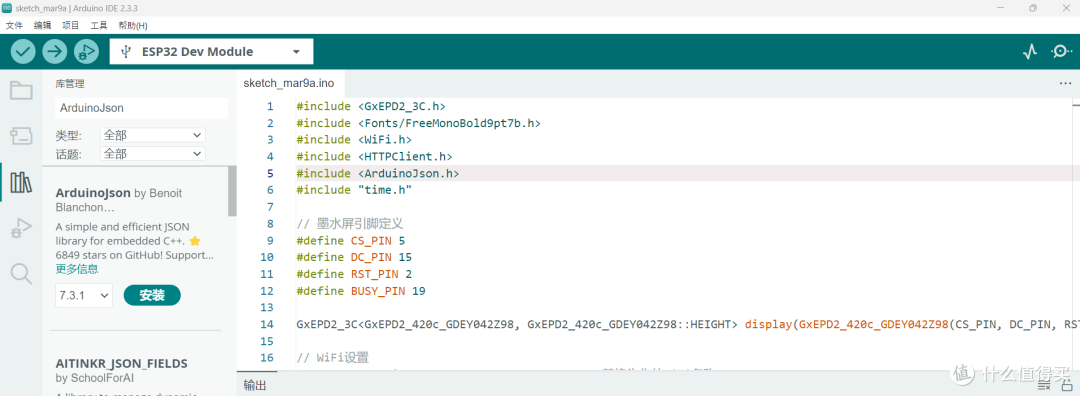
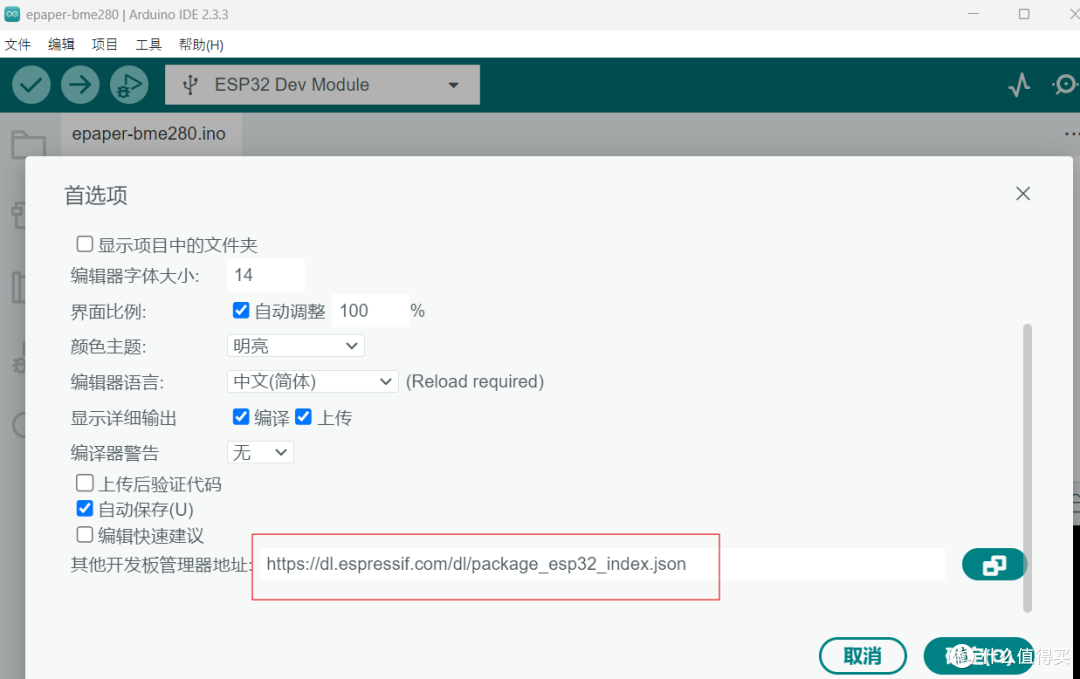
因为我的主控是ESP32,所以要选择对应的首选项:
添加对应开发板的网址。
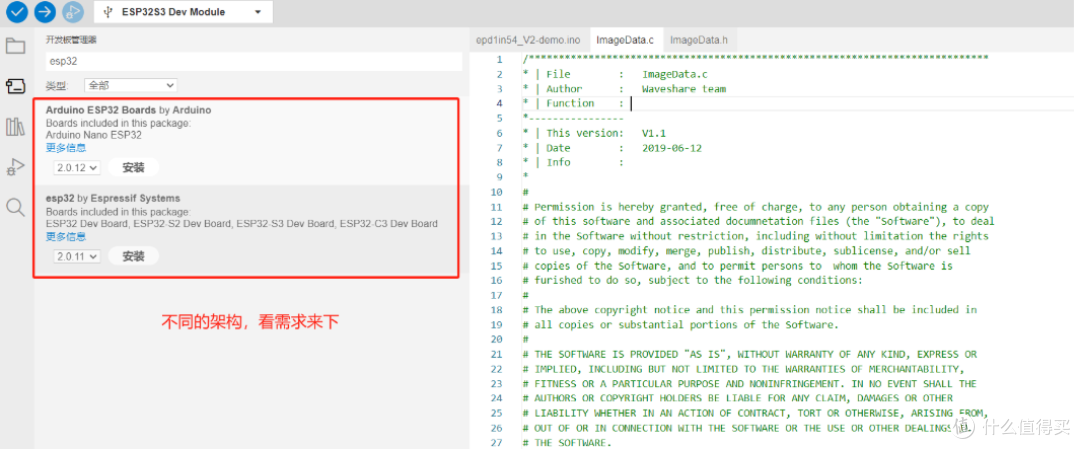
在库管理中选择Arduino ESP32的库,添加安装。国内网络较慢,也可以选择离线安装包。
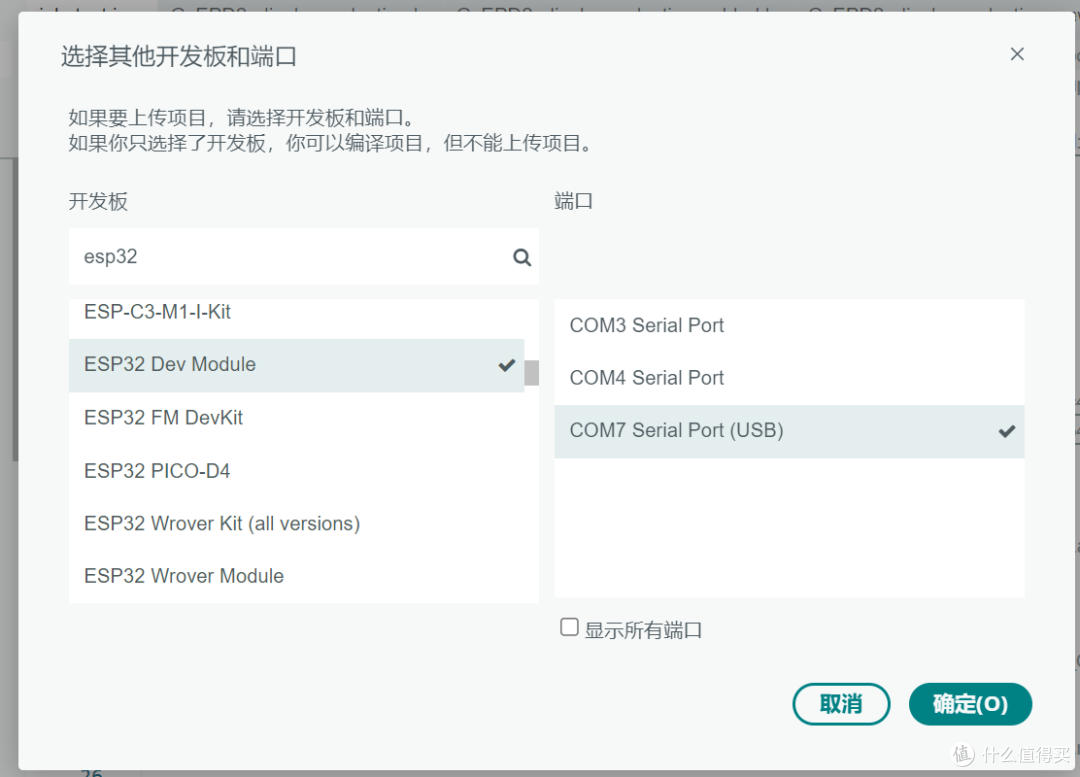
将EPS32通过USB口连接电脑,按照我购买的开发板的介绍文档,选择开发板为ESP32 Dev Module和对应的端口。
可以查看串口监视器没有报错,就说明开发板以及USB连线没有问题。
下面要准备EPS32及其其他配件的连线。
驱动板连接4.2寸墨水屏,这里是不区分金手指的上下方向的,排线为24p。

然后再将墨水屏的驱动板和ESP32通过杜邦线连接,再将BME280也一并连接。
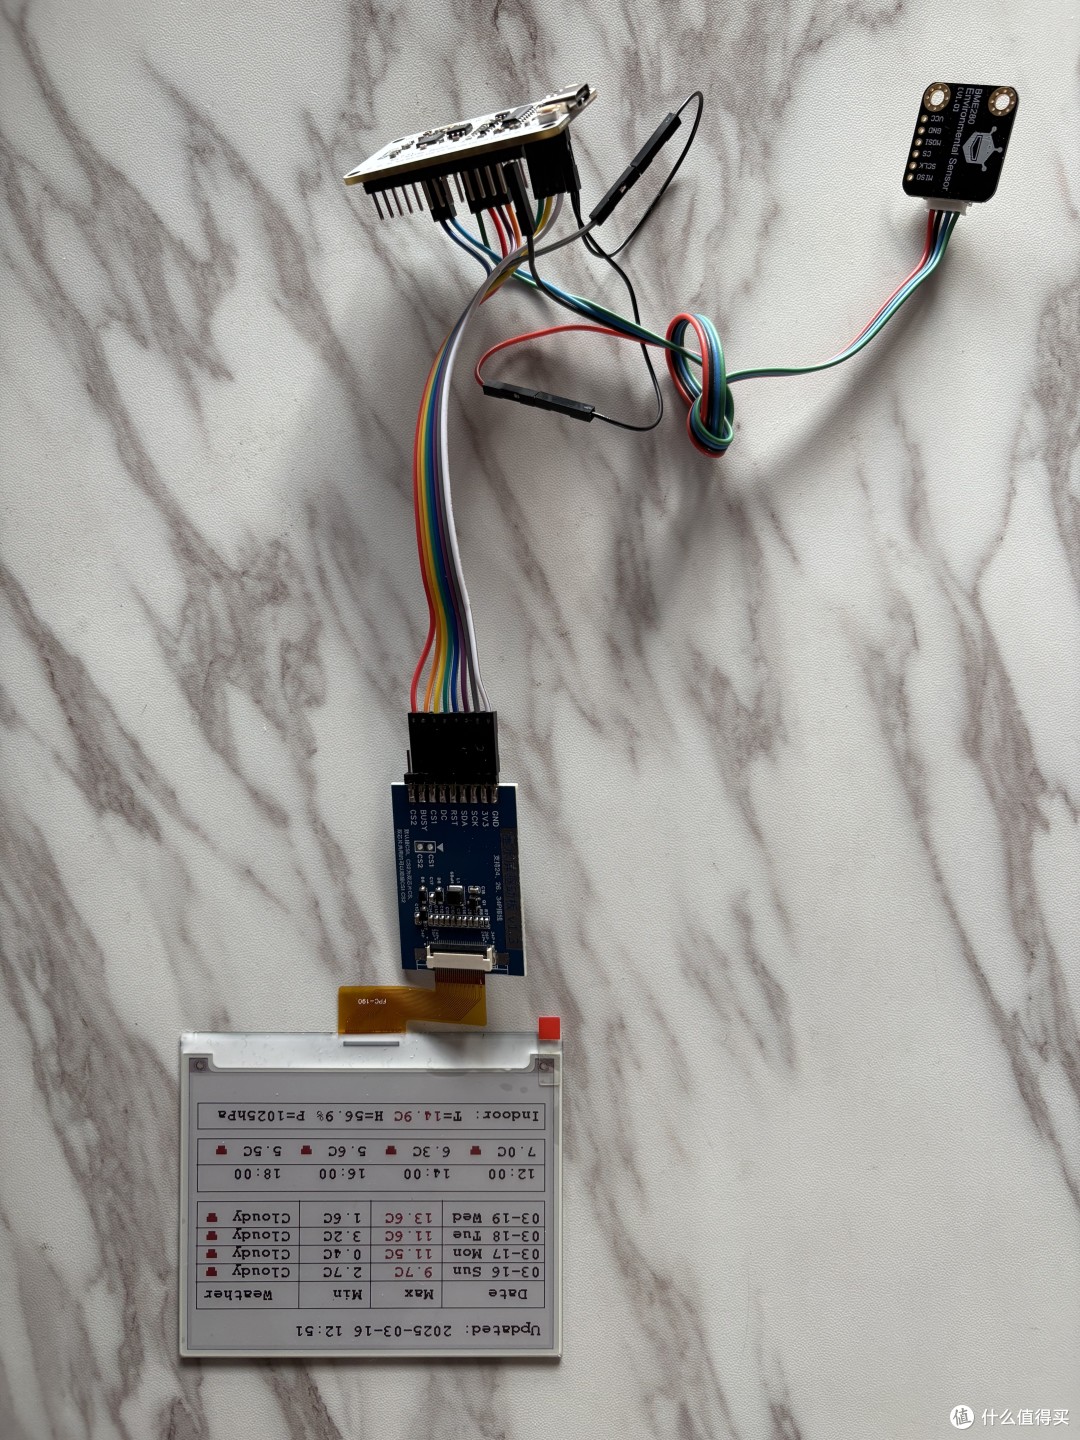
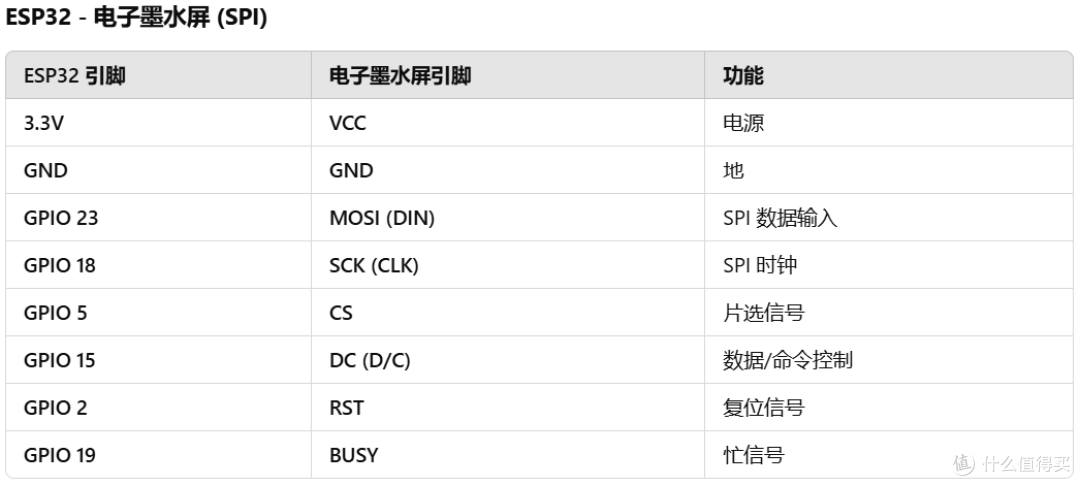
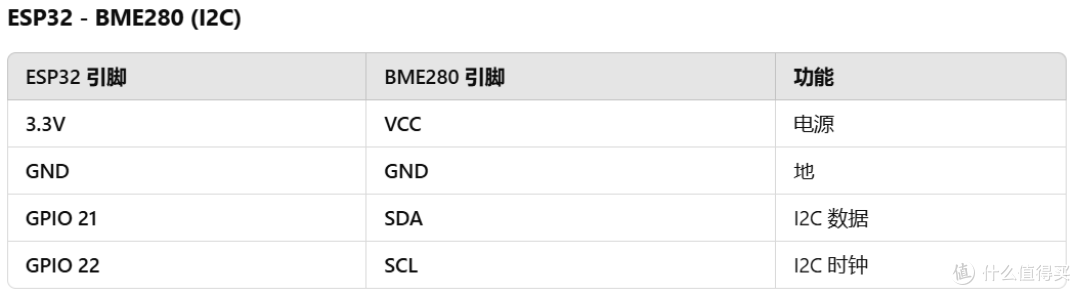
引脚连线不少是可以自定义的,只要在代码中注明即可。
// 引脚定义
#define CS_PIN 5
#define DC_PIN 15
#define RST_PIN 2
#define BUSY_PIN 19
#define SDA_PIN 21
#define SCL_PIN 22
#define I2C_ADDRESS 0x77
BME280的传感器看文档是只支持3.3v供电的,也没有看到有降压模块;而ESP32只有一个3.3v引脚,一个5v引脚,但是我自己测试了接5v似乎也可以正常工作,不过为了以防万一,我还是接了1分2杜邦线把3.3v引出两根分别连接了墨水屏驱动板和BME280.
代码部分我完全是让ChatGPT帮我写的,4.2寸墨水屏使用GxEPD2_420c_GDEY042Z98对象。
// 定义显示对象
GxEPD2_3C display(GxEPD2_420c_GDEY042Z98(CS_PIN, DC_PIN, RST_PIN, BUSY_PIN));
// 定义 BME280 对象
Adafruit_BME280 bme;
天气预报的API网上有很多,但是大多是付费的,或者至少要绑定信用卡支付方式。我利用AI推荐了一些免费的,比如open-meteo,足够个人使用了。
完整的代码如下,记得将WIFI的连接名和密码修改掉。
#include
#include
#include
#include
#include // 添加 ArduinoJson 库
#include "time.h"
#include
#include
#include
// 引脚定义
#define CS_PIN 5
#define DC_PIN 15
#define RST_PIN 2
#define BUSY_PIN 19
#define SDA_PIN 21
#define SCL_PIN 22
#define I2C_ADDRESS 0x77
// 定义显示对象
GxEPD2_3C display(GxEPD2_420c_GDEY042Z98(CS_PIN, DC_PIN, RST_PIN, BUSY_PIN));
// 定义 BME280 对象
Adafruit_BME280 bme;
const char* ssid = WIFI名称;
const char* password = WIFI密码;
const char* ntpServer1 = "pool.ntp.org";
const char* ntpServer2 = "time.google.com";
const long gmtOffset_sec = 8 * 3600;
const int daylightOffset_sec = 0;
// 定义常量
#define DAILY_FORECAST 4
#define HOURLY_FORECAST 4
const char* weekdays[] = {"Sun", "Mon", "Tue", "Wed", "Thu", "Fri", "Sat"};
void setup() {
Serial.begin(115200);
display.init();
display.setRotation(0);
display.fillScreen(GxEPD_WHITE);
display.setTextColor(GxEPD_BLACK);
display.setFont(&FreeMonoBold9pt7b);
connectWiFi();
configTime(gmtOffset_sec, daylightOffset_sec, ntpServer1, ntpServer2);
if (!syncTime()) {
Serial.println("❌ Time sync failed");
}
Wire.begin(SDA_PIN, SCL_PIN);
if (!bme.begin(I2C_ADDRESS)) {
Serial.println("❌ BME280 not detected!");
while (1);
}
updateDisplay();
}
void loop() {
delay(3600000); // 每小时更新
updateDisplay();
}
void connectWiFi() {
WiFi.begin(ssid, password);
int attempts = 0;
while (WiFi.status() != WL_CONNECTED && attempts < 20) {
delay(500);
Serial.print(".");
attempts++;
}
if (WiFi.status() == WL_CONNECTED) {
Serial.println("nConnected to WiFi");
} else {
Serial.println("n❌ WiFi connection failed");
}
}
bool syncTime() {
struct tm timeinfo;
int attempts = 0;
while (!getLocalTime(&timeinfo) && attempts < 10) {
Serial.println("Waiting for time sync...");
delay(1000);
attempts++;
}
return getLocalTime(&timeinfo);
}
void drawWeatherIcon(int x, int y, int weatherCode) {
display.setTextColor(GxEPD_RED);
switch (weatherCode) {
case 0: display.fillCircle(x + 8, y + 8, 6, GxEPD_RED); display.drawLine(x + 8, y, x + 8, y + 2, GxEPD_RED); display.drawLine(x + 8, y + 14, x + 8, y + 16, GxEPD_RED); display.drawLine(x, y + 8, x + 2, y + 8, GxEPD_RED); display.drawLine(x + 14, y + 8, x + 16, y + 8, GxEPD_RED); break;
case 1: case 2: case 3: display.fillRect(x + 2, y + 4, 12, 6, GxEPD_RED); display.fillRect(x + 4, y + 10, 8, 4, GxEPD_RED); break;
case 51: case 53: case 55: display.drawLine(x + 4, y + 4, x + 4, y + 8, GxEPD_RED); display.drawLine(x + 8, y + 6, x + 8, y + 10, GxEPD_RED); display.drawLine(x + 12, y + 4, x + 12, y + 8, GxEPD_RED); break;
case 61: case 63: case 65: display.fillRect(x + 2, y + 2, 12, 4, GxEPD_RED); display.drawLine(x + 4, y + 8, x + 4, y + 12, GxEPD_RED); display.drawLine(x + 10, y + 8, x + 10, y + 12, GxEPD_RED); break;
case 80: case 81: case 82: display.fillRect(x + 2, y + 2, 12, 4, GxEPD_RED); display.drawLine(x + 2, y + 8, x + 2, y + 12, GxEPD_RED); display.drawLine(x + 6, y + 8, x + 6, y + 12, GxEPD_RED); display.drawLine(x + 10, y + 8, x + 10, y + 12, GxEPD_RED); break;
case 95: display.fillRect(x + 2, y + 2, 12, 4, GxEPD_RED); display.drawLine(x + 8, y + 6, x + 4, y + 12, GxEPD_RED); display.drawLine(x + 4, y + 12, x + 12, y + 12, GxEPD_RED); break;
default: display.drawLine(x + 8, y + 2, x + 8, y + 6, GxEPD_RED); display.drawPixel(x + 8, y + 8, GxEPD_RED); break;
}
display.setTextColor(GxEPD_BLACK);
}
void updateDisplay() {
struct tm timeinfo;
char dateStr[20];
if (!getLocalTime(&timeinfo)) {
strcpy(dateStr, "Time N/A");
} else {
strftime(dateStr, sizeof(dateStr), "%Y-%m-%d %H:%M", &timeinfo);
}
String weatherData = getWeatherData();
DynamicJsonDocument doc(4096);
bool weatherValid = (weatherData != "" && deserializeJson(doc, weatherData) == DeserializationError::Ok);
float temp = bme.readTemperature();
float hum = bme.readHumidity();
float pres = bme.readPressure() / 100.0F;
display.fillScreen(GxEPD_WHITE); // 白色背景
display.setTextColor(GxEPD_BLACK);
// 1. 顶部显示时间(黑色)
display.setCursor(10, 20);
display.print("Updated: ");
display.print(dateStr);
// 2. 每日天气预报(今天+未来3天)
display.drawRect(5, 40, 390, 120, GxEPD_BLACK); // 黑色边框
display.drawLine(5, 70, 395, 70, GxEPD_BLACK);
display.drawLine(120, 40, 120, 160, GxEPD_BLACK);
display.drawLine(200, 40, 200, 160, GxEPD_BLACK);
display.drawLine(280, 40, 280, 160, GxEPD_BLACK);
display.setCursor(25, 60);
display.print("Date");
display.setCursor(130, 60);
display.print("Max");
display.setCursor(210, 60);
display.print("Min");
display.setCursor(310, 60);
display.print("Weather");
if (weatherValid) {
JsonArray dailyTime = doc["daily"]["time"];
JsonArray dailyTempMax = doc["daily"]["temperature_2m_max"];
JsonArray dailyTempMin = doc["daily"]["temperature_2m_min"];
JsonArray dailyWeatherCode = doc["daily"]["weathercode"];
time_t now;
time(&now);
struct tm currentTime;
localtime_r(&now, ¤tTime); // 修正为指针
for (int i = 0; i < DAILY_FORECAST; i++) {
String dateStr = String(dailyTime[i]).substring(5);
float tempMax = dailyTempMax[i];
float tempMin = dailyTempMin[i];
int weatherCode = dailyWeatherCode[i];
String weatherDesc = getWeatherDescription(weatherCode);
int weekdayIndex = (currentTime.tm_wday + i) % 7;
String weekday = weekdays[weekdayIndex];
int yPos = 70 + i * 20 + 15;
// 日期和星期(黑色)
display.setTextColor(GxEPD_BLACK);
display.setCursor(10, yPos);
display.print(dateStr);
display.print(" ");
display.print(weekday);
// 最高温(红色)
display.setTextColor(GxEPD_RED);
display.setCursor(130, yPos);
display.print(String(tempMax, 1));
display.print("C");
// 最低温(黑色)
display.setTextColor(GxEPD_BLACK);
display.setCursor(210, yPos);
display.print(String(tempMin, 1));
display.print("C");
// 天气描述(黑色)+ 图标(红色)
display.setTextColor(GxEPD_BLACK);
display.setCursor(290, yPos);
display.print(weatherDesc);
drawWeatherIcon(370, yPos - 12, weatherCode); // 红色图标
if (i < DAILY_FORECAST - 1) {
display.drawLine(5, 70 + (i + 1) 20, 395, 70 + (i + 1) 20, GxEPD_BLACK);
}
}
// 3. 小时天气预报
display.drawRect(5, 170, 390, 60, GxEPD_BLACK);
display.drawLine(5, 200, 395, 200, GxEPD_BLACK);
JsonArray hourlyTime = doc["hourly"]["time"];
JsonArray hourlyTemp = doc["hourly"]["temperature_2m"];
JsonArray hourlyWeatherCode = doc["hourly"]["weathercode"];
int currentHour = currentTime.tm_hour;
// 标题(黑色)
display.setTextColor(GxEPD_BLACK);
for (int i = 0; i < HOURLY_FORECAST; i++) {
int hourIndex = currentHour + i * 2;
if (hourIndex >= 24) hourIndex -= 24;
String timeStr = String(hourIndex) + ":00";
int xPos = 15 + i * 95;
display.setCursor(xPos, 195);
display.print(timeStr);
}
// 数据行(温度黑色,图标红色)
for (int i = 0; i < HOURLY_FORECAST; i++) {
float hourlyTempVal = hourlyTemp[i * 2];
int hourlyWeather = hourlyWeatherCode[i * 2];
int xPos = 15 + i * 95;
display.setTextColor(GxEPD_BLACK);
display.setCursor(xPos, 220);
display.print(String(hourlyTempVal, 1));
display.print("C");
drawWeatherIcon(xPos + 60, 208, hourlyWeather); // 红色图标
}
} else {
display.setTextColor(GxEPD_BLACK);
display.setCursor(10, 100);
display.print("Weather data unavailable");
}
// 4. BME280数据(温度红色,其他黑色)
display.drawRect(5, 240, 390, 30, GxEPD_BLACK);
display.setTextColor(GxEPD_BLACK);
display.setCursor(10, 260);
display.print("Indoor: T=");
display.setTextColor(GxEPD_RED); // 温度红色
display.print(String(temp, 1));
display.print("C");
display.setTextColor(GxEPD_BLACK); // 湿度、气压黑色
display.print(" H=");
display.print(String(hum, 1));
display.print("% P=");
display.print(String(pres, 0));
display.print("hPa");
display.display();
}
String getWeatherData() {
HTTPClient http;
http.begin(url);
int attempts = 0;
int httpCode = -1;
while (attempts < 3 && httpCode <= 0) {
httpCode = http.GET();
if (httpCode > 0) {
String payload = http.getString();
http.end();
return payload;
} else {
Serial.print("HTTP request failed, code: ");
Serial.println(httpCode);
delay(1000);
attempts++;
}
}
http.end();
return "";
}
String getWeatherDescription(int code) {
switch (code) {
case 0: return "Clear";
case 1: case 2: case 3: return "Cloudy";
case 51: case 53: case 55: return "Drizzle";
case 61: case 63: case 65: return "Rain";
case 80: case 81: case 82: return "Showers";
case 95: return "Thunderstorm";
default: return "Unknown";
}
}
点击上传按钮,将代码烧录到ESP32开发板上。
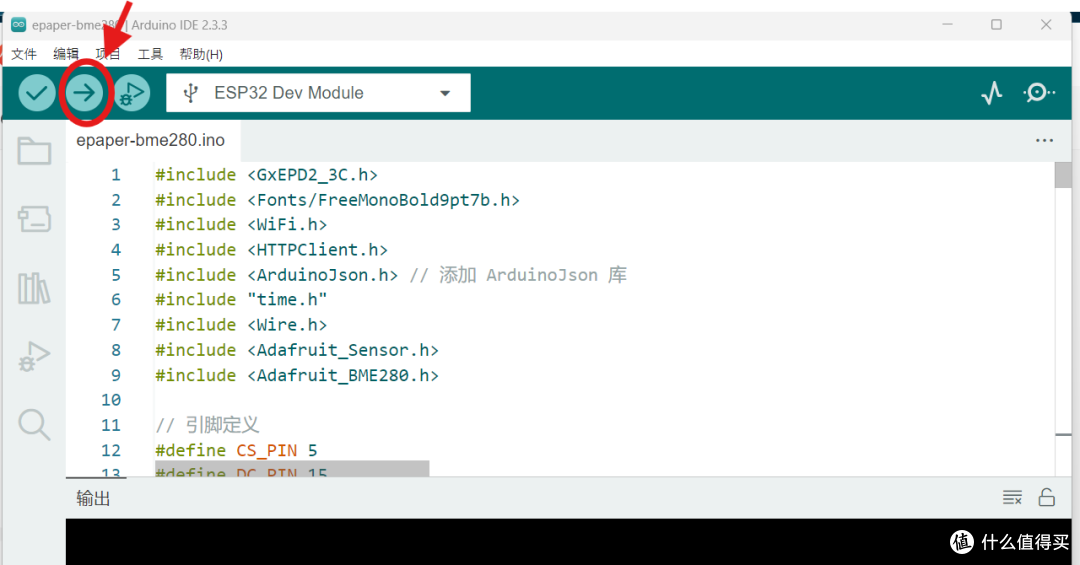
可以根据实际显示结果告知ChatGPT,让AI帮我调整代码。
电脑上调试没问题,就可以将开发板接上电池直接作为桌面摆件使用。
淘宝上买了个充电电池,Type-C接口。
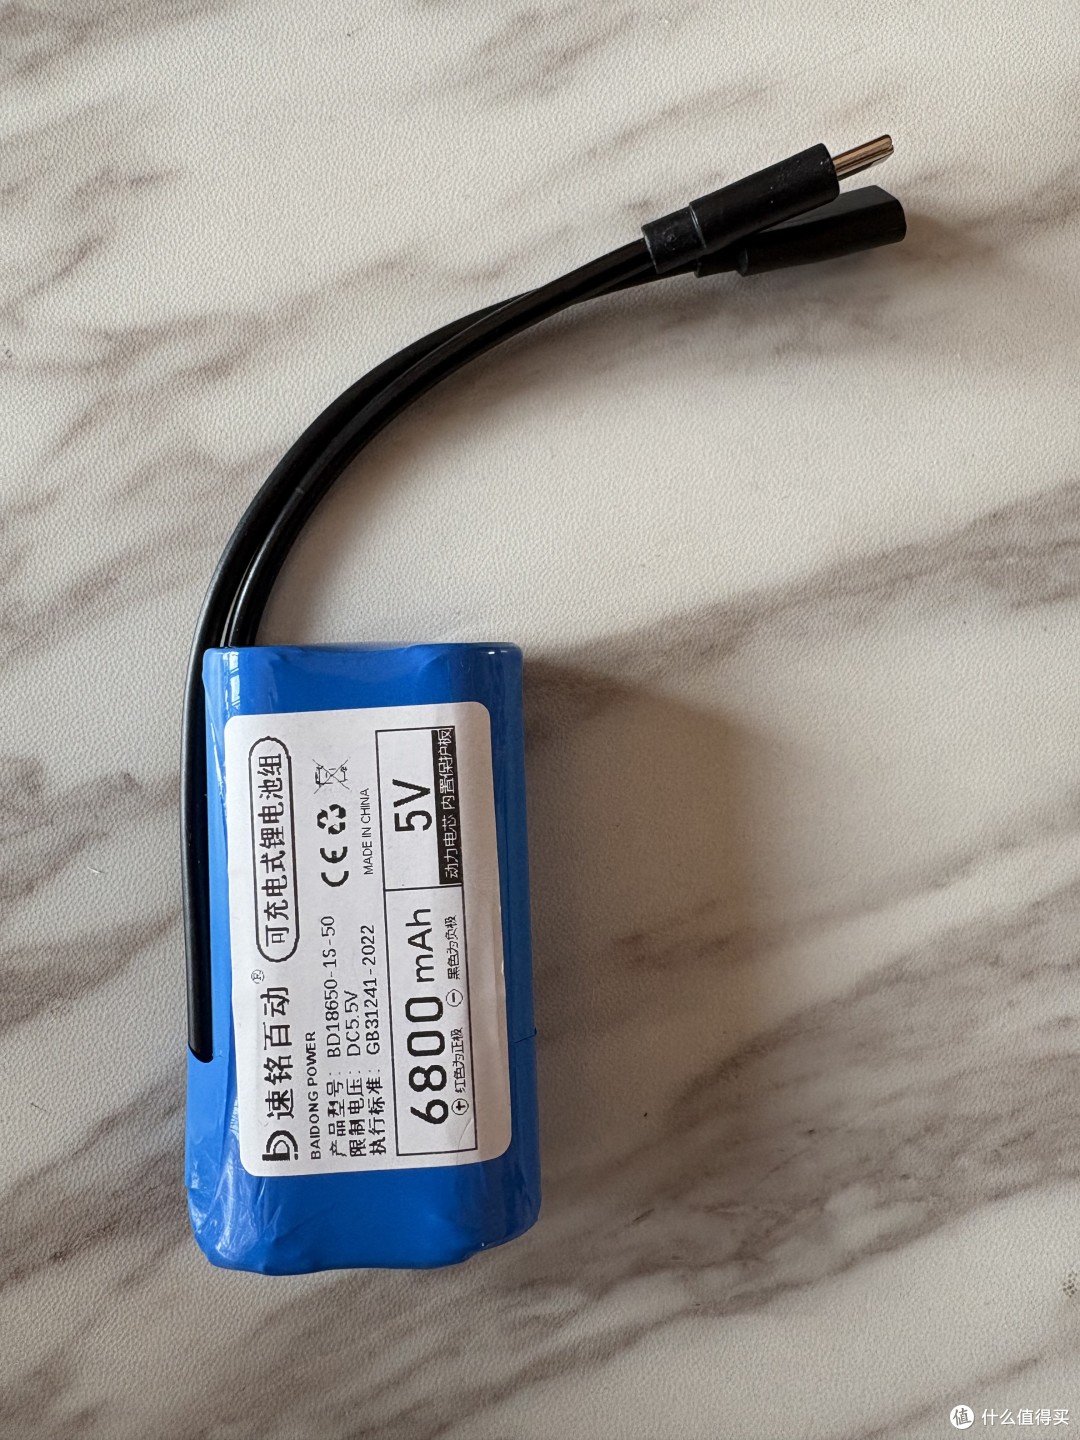
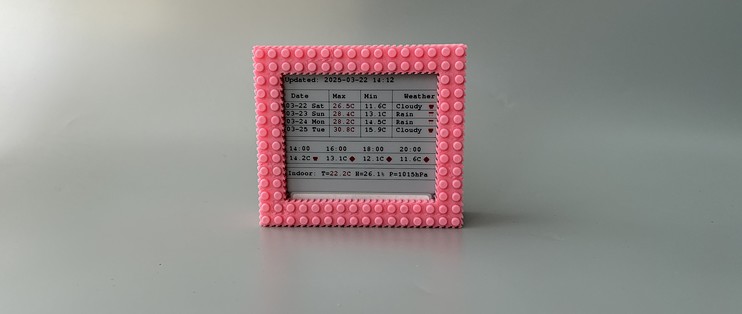
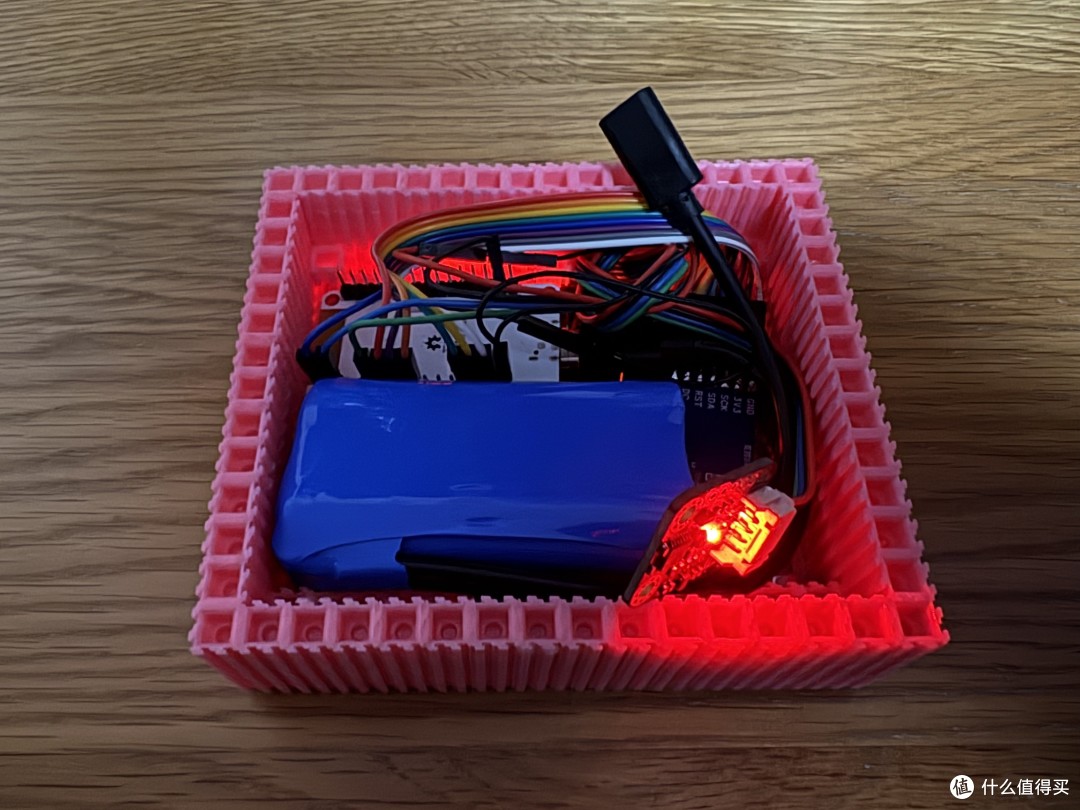
摆件还需要有个外壳,有条件的可以用3D打印,我这里用了8mm的微积木,淘宝上只要几块钱,大概用了600颗。
把所有配件都塞到外壳中去。
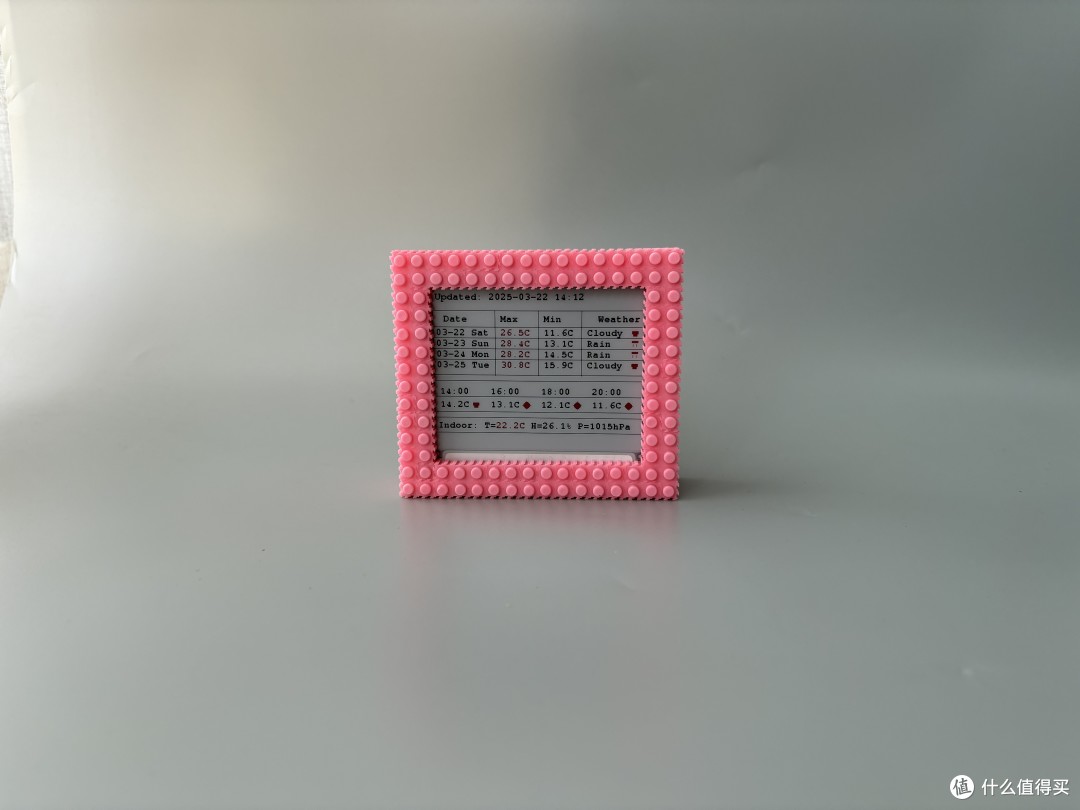
最后显示效果是这样:
最上方是今天,及未来三天的天气预报;下方是当前,及未来6小时的天气预报;最下方是BME280监测到的室内温度、湿度和大气压。
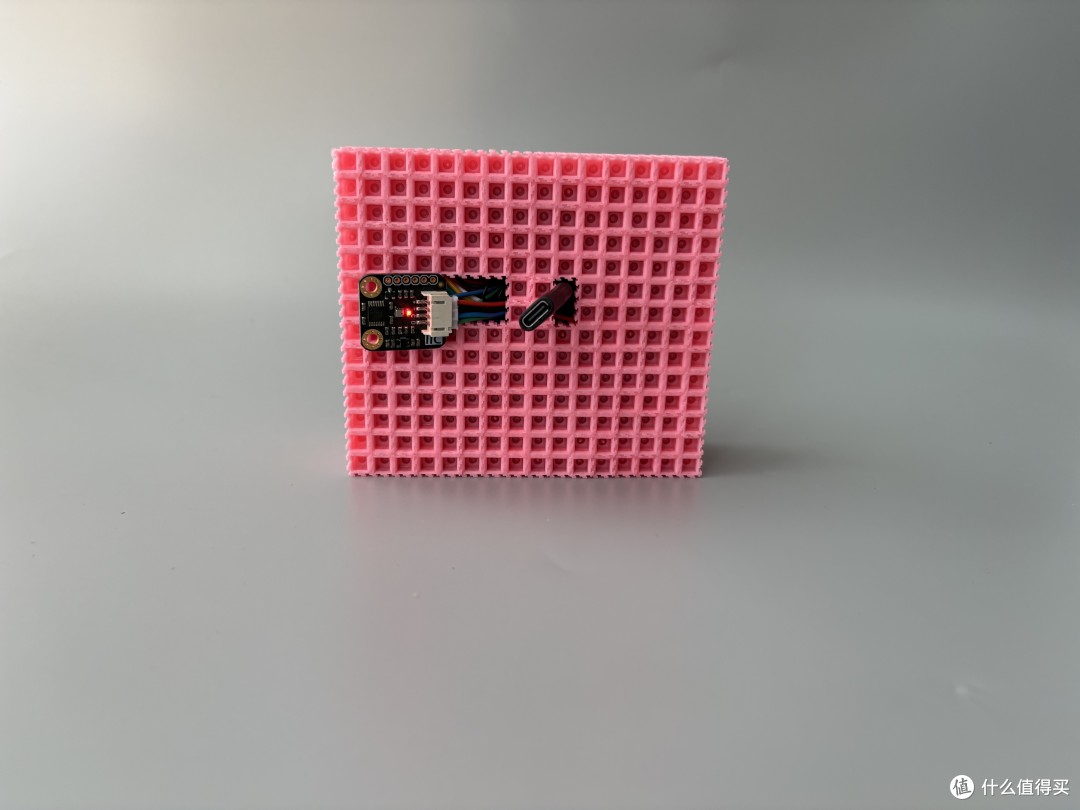
摆件的背面我把BME280给引出来以避免影响监测精度,还有充电口也给拉出来了。
其实墨水屏的显示非常省电,而且代码设定为每隔1个小时刷新一次,电池充满电可以用很长一段时间。
通过这个实例我深切感受到AI写代码能力的强大,让普通人也能成为资深程序猿,可以自己开发一些小的应用,买块大一点的墨水屏,自己DIY一个电纸书应该也没什么问题吧。






校验提示文案
校验提示文案
校验提示文案
校验提示文案
校验提示文案
校验提示文案
校验提示文案
校验提示文案
校验提示文案
校验提示文案
说实话应该能玩出其他花来
校验提示文案
校验提示文案
校验提示文案
校验提示文案
校验提示文案
校验提示文案
校验提示文案
校验提示文案
说实话应该能玩出其他花来
校验提示文案
校验提示文案
校验提示文案
校验提示文案
校验提示文案
校验提示文案
校验提示文案
校验提示文案
校验提示文案
校验提示文案
校验提示文案
校验提示文案
校验提示文案
校验提示文案